Family Birthdays or Celebrations Wall Hanging Plaque: Step-By-Step DIY or Where To Buy
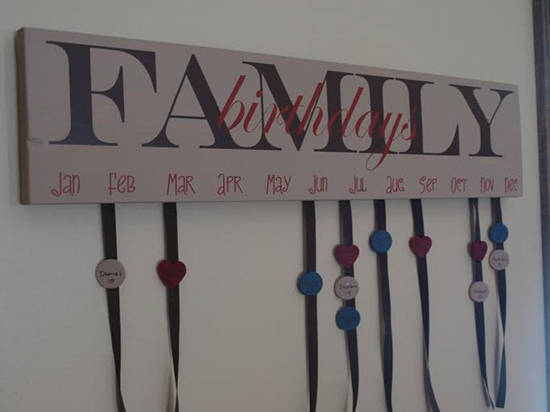
These are adorable and very popular creations to hang on your own wall or give as an incredible gift to someone! They are easy to make and here's the instructions!
Author: Cassie
Ingredients
- Wooden Board in 6" x 28", 18" x 6" board or 24" x 8"
- Paint in your color choice
- Letters - you can paint them on, stencil them on, use die cut letters, wooden letters, scrapbooking stickers, scrapbook paper cut letters or the best, cleanest and most popular option is to use Vinyl Lettering.
- Mod Podge to seal the wood after you make your letters.
- Wooden or thin metal circles or hearts (hearts are good for the anniversaries if you are doing a "family celebrations" plaque). Most popular size is 1" or you can do 1.5" too. Metal circles need to have the holes in the top and bottom already.
- Something to attach your circles and/or hearts. Ribbon is a good easy way to attach them. You also could use oval jump rings or jewelry wire, screw eyes or cup hooks.
- Hook on back for hanging
Instructions
- Cut wood to 6x28 and sand smooth.
- Paint wood desired paint color - recommended to do at least 2 coats. Let dry completely.
- Apply vinyl letters or other form of lettering you want in desired spots and apply paint – let dry completely. Only paint one color at a time and wait for paint to dry completely before applying the second color!
- Insert cup hooks at desired lengths apart under the Months (attach ribbon to back of sign by every month with glue, I secure with a thumb tack as well).
- Paint the 1” circles, heart, etc and let dry!
- Use a fine tip Sharpie to write names and date of birthday or anniversary.
- Drill small holes in the painted shapes and insert the oval jump rings to attach to the Cup hooks and other shapes. Or if you are using wooden shapes, screw the screw eyes (see image below) into the top and bottom of each shape and then attach with oval jump rings. (If using the ribbon, just attach shapes to ribbon using glue).
- Add a hook to the back for hanging.
Notes
Now for some other modifications/ideas. These are to aid in helping you find the best ideas for your skills, budget and time! For the wording on the board: If you use scrapbooking stickers, it is highly recommend to attach them with craft glue for extra secure adhesive and then coat with Mod Podge. At Hobby Lobby, we found a number of possible sticker ideas. Note that you can find scrapbook stickers everywhere, including Walmart, so you might just find a big enough "family" or "celebrations" sticker and get creative. You can also use stencils and paint or vinyl lettering for the letters/words/months. For the shapes: Finally, depending on the circles, heart preferences, you can go with the wooden ones shown in the steps above and use the screw eyes or drill small holes in the top and bottom. You can also go with metal. We have also heard from some of you that you made clay circles as well! There are many options for this too!
Recipe by The Thrifty Couple at https://thethriftycouple.com/printable-instructions-for-the-family-birthdays-or-celebrations-wall-hanging-plaque/